Valley Center DMR
As with everything else on this web site, this area of information will be updated periodically.
Currently, our "go to" hand-held DMR radios are the AnyTone AT-D878UV. Several folks have the AnyTone AT-D578UV Pro mobile radios as well. We also have available several Motorola xpr6500's and xpr6550's for VCARC use. These Motorola radios are set up as generic with generic DMR IDs and, therefore, cannot be used for DMR repeater access. They can, however, be used for 70cm analog repeater access and 70cm DMR simplex.
***Please note the AT-D878UV now, also, comes in an upgraded version called the AT-D878UV-II Pro. The Code Plug is the same, but the CPS and Firmware are different from that of the older, non-II Pro version. I believe very few people will find much of an advantage to the II Pro version at this time. The main advantages are additional memory for contacts and being able to receive APRS as well as transmit APRS.
AnyTone AT-D878UV operation and programming
(For AT-D578UV programming and CodePlug click HERE)
If you wish to download a better copy of the user's manual in .PDF format click HERE.
For those who have the BlueTooth model you can download the BlueTooth user's manual in .PDF format HERE. I highly recommend it. Activating the BlueTooth on the radio is covered on the next page, which you can quickly get to by clicking HERE. Otherwise, you can click to there from the end of this page.
In order to set up and program the AT-D8787UV you will need not only the radio, but also the programming software and programming cable. If for some reason they were not supplied or you do not have them, stop now and get them. The other things you will need is your DMR ID and your call sign. If you don't have BOTH of them then, as Mr. Toad would say: "Turn back now!" and get them. You can get your DMR ID from www.radioid.net. Bruce (KM6KSM) wrote detailed instructions on working through the radioid.net mess.
1. If you haven't already done so install the programming software.
TIP: the radios come with either a mini-CD or a USB drive. Both contain all necessary software. Please note that Windows 10 already has the appropriate software to un-zip the software drivers and they will install normally. HOWEVER, those who are still using Windows 7 or 8 will require an additional (or several) steps to properly install the drivers. You will need to install a third party application, such as 7-ZIP, to un-zip the driver files then install them. During the installation you will need to know if your operating system is 32 or 64 bit. Click 7-ZIP here or above to access the appropriate website for download.
The shortcut should be installed on your desktop and is called "D878UV_1.23". I'm sure the version number will change as they update the software. This is the current version as of July, 2021.
2. Download our most current AT-D878 CodePlug from our site by clicking HERE. |
TIP: Please note you will need to use either Chrome or FireFox to download. Bing and IE doesn't work!
These will continually be updated as needed. Although there may be several versions of the CodePlug listed ALWAYS DOWNLOAD THE LATEST. The CodePlug is generic and you will need to modify it for your radio. This CodePlug was originally designed by Brian Slosson (KC2GNV). It has been modified to be more specific by and relevant in and around Valley Center by Mike Bradbury (N2DDS).
3. Once you've initiated the programming software, load the CodePlug into your programming software by clicking "File" and selecting the correct CodePlug from where ever you downloaded it.
TIP: I recommend you download the CodePlug to your desktop for future easy access and modifications once you become more familiar with it. Additionally, I highly recommend you click "Save As" and save the Code Plug to your desktop with a name like [your call].rdt. Replace [your call] with your call sign.
This CodePlug is generic and needs to be customized to you. We will get into that next. An excellent PDF file by David Hull (KC6N) explains the details of the D878UV CodePlug. Download the article HERE.
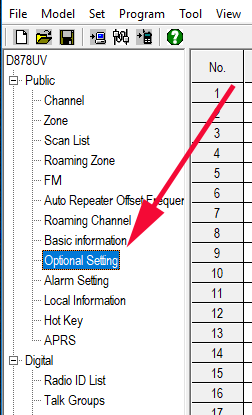
4. Once you have renamed and loaded your CodePlug (the one which you renamed with you call sign .rdt) there are several changes you will need to make to the new CodePlug, then re-save, overwriting any earlier CodePlugs. The changes are as follows:
Go to Optional Settings and select it.
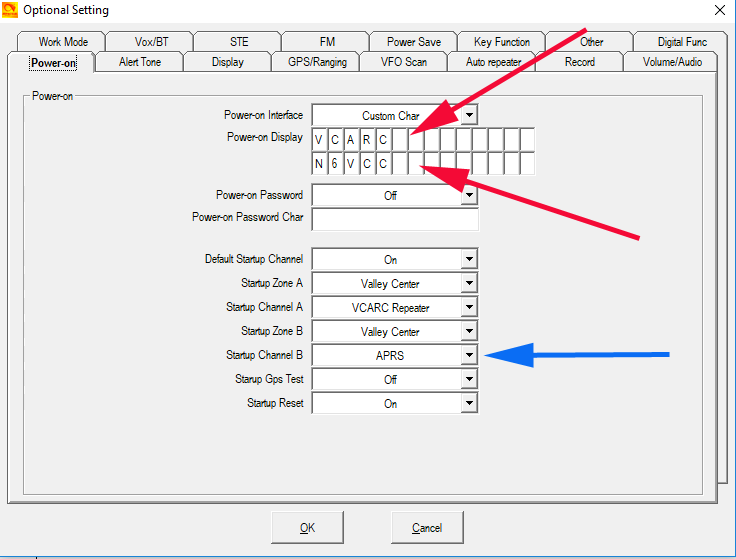
The following screen is displayed, and select Power-On
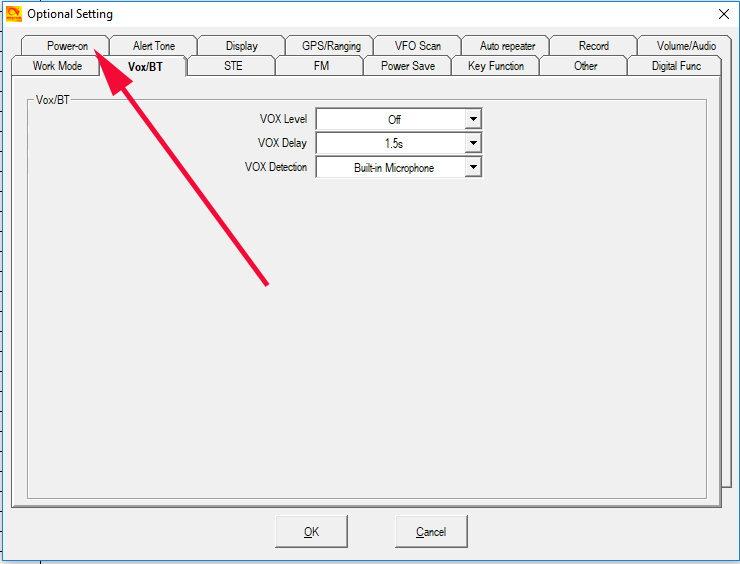
Enter your name in the top spaces and your call sign in the bottom spaces;
If you want a different channel for Channel B then select it. Otherwise, leave it alone.
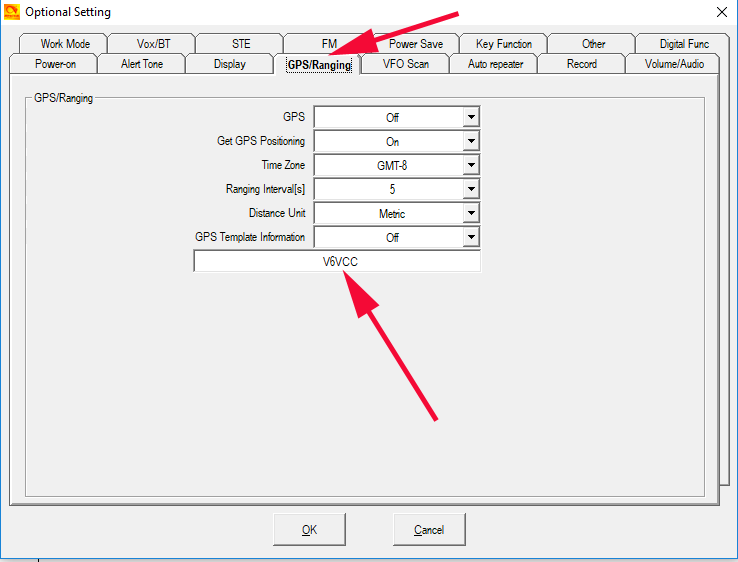
Next select GPS/Ranging. Enter your call sign in the last box. Click OK to exit.
TIP: If your screen only opens two boxes and does NOT look like the screen below then:
1) Click OK to exit;
2) Select "Tools" from the top menu bar, then "Options" from the dropdown menu;
3) If unchecked then CHECK the "GPS" and "APRS" boxes. If you have a BlueTooth version of the radio then check the "BlueTooth" box as well;
4) Go back to "Optional Settings" / "GPS/Ranging" and enter your call sign. Click OK and exit.
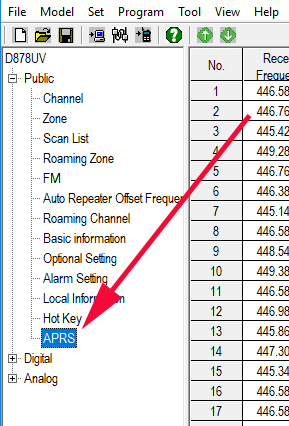
Select APRS from the main screen.
TIP: If "APRS" is not available for selection then do the following:
1) Select "Tool" from the top of the main screen;
2) Select "Options" from the dropdown menu;
3) Make sure "APRS" and "GPS" are selected on the Annex Function Setting menu which appears, and click "OK". "APRS" should now be visible (may have to refresh the page);
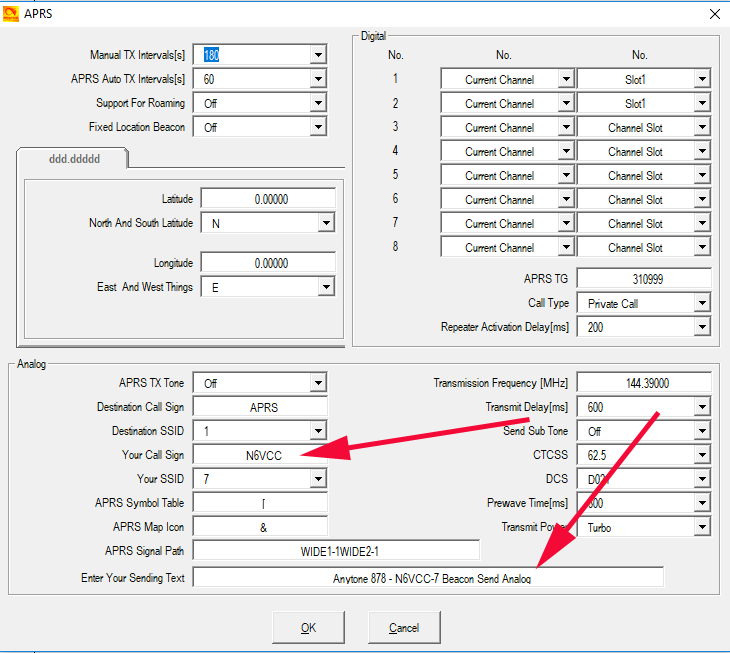
The following screen is displayed. Enter your call sign in BOTH places marked. Don't change anything else at this time. We'll go over these settings at a VCARC meeting.
Click OK to exit back to main screen.
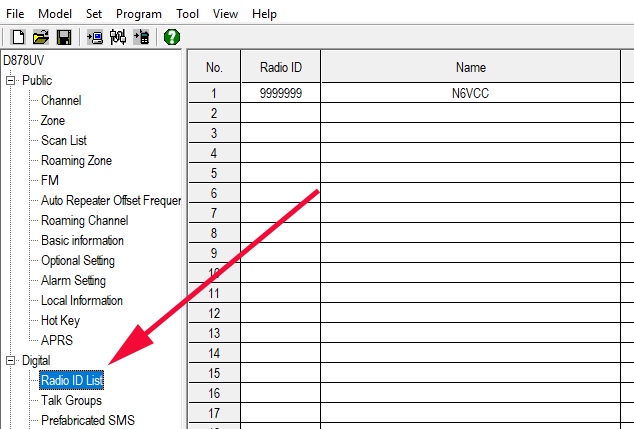
Select DIGITAL and then select Radio ID List;
Double click on the first line (line one) to the right and a new screen appears.
Replace the existing Radio ID with yours, and replace the call sign under NAME with your call sign. This would be a good time to SAVE your new Code Plug...click Save.
When you have completed all the initial setup (we can make changes later) and saved the file, you can move on to programming your radio. Click HERE to load the Code Plug and do other things to your radio.